How to Pack a Backpacking Pack
Learn how to pack a backpacking pack correctly—from weight distribution and zone-based organization to fitting your harness and waterproofing your gear.
I’ve watched a lot of hikers suffer through the first miles of a trip hauling a poorly packed pack — shoulders burning, lower back aching, constantly stopping to dig gear out from the bottom. Most of them had decent gear. Their problem wasn’t what they packed; it was how they packed it.
The difference between a miserable slog and an enjoyable day out often comes down to how you pack, not what you pack. A well-organized, properly balanced pack feels like it’s working with you. A bad one fights you every step.
This guide covers everything you need to nail: the zone-based packing system, weight distribution, how to actually fit and adjust your harness, and how to keep your gear dry. Get these four things right and your pack becomes nearly invisible on the trail — which is exactly how it should feel.
Organize your gear
Packstack helps you track your gear, create packing lists, share your setup, estimate calorie requirements, and a whole lot more—all for free.
Get StartedBefore You Load a Single Item: Get the Right Size
None of the packing advice below matters much if your pack is the wrong volume for your gear. Putting 50 liters’ worth of gear in a 40-liter pack is a recipe for disaster — not only are you bound to have poor weight distribution, but you’re also likely to max out the pack’s load range, a guarantee for discomfort.
Going too big has its own problems. A pack that’s too large will focus all the weight towards the bottom and carry your load inefficiently, and carrying a large-capacity pack when you don’t necessarily need it can make it tempting to bring more gear and end up overloaded on the trail.
As a general weight target: aim to keep your total pack weight at about 20–25% of your body weight. For ultralight setups, base weights under 10 lbs are achievable — but that’s a topic for another article. For now, focus on fitting your actual gear into a pack that leaves a little room but not a lot.
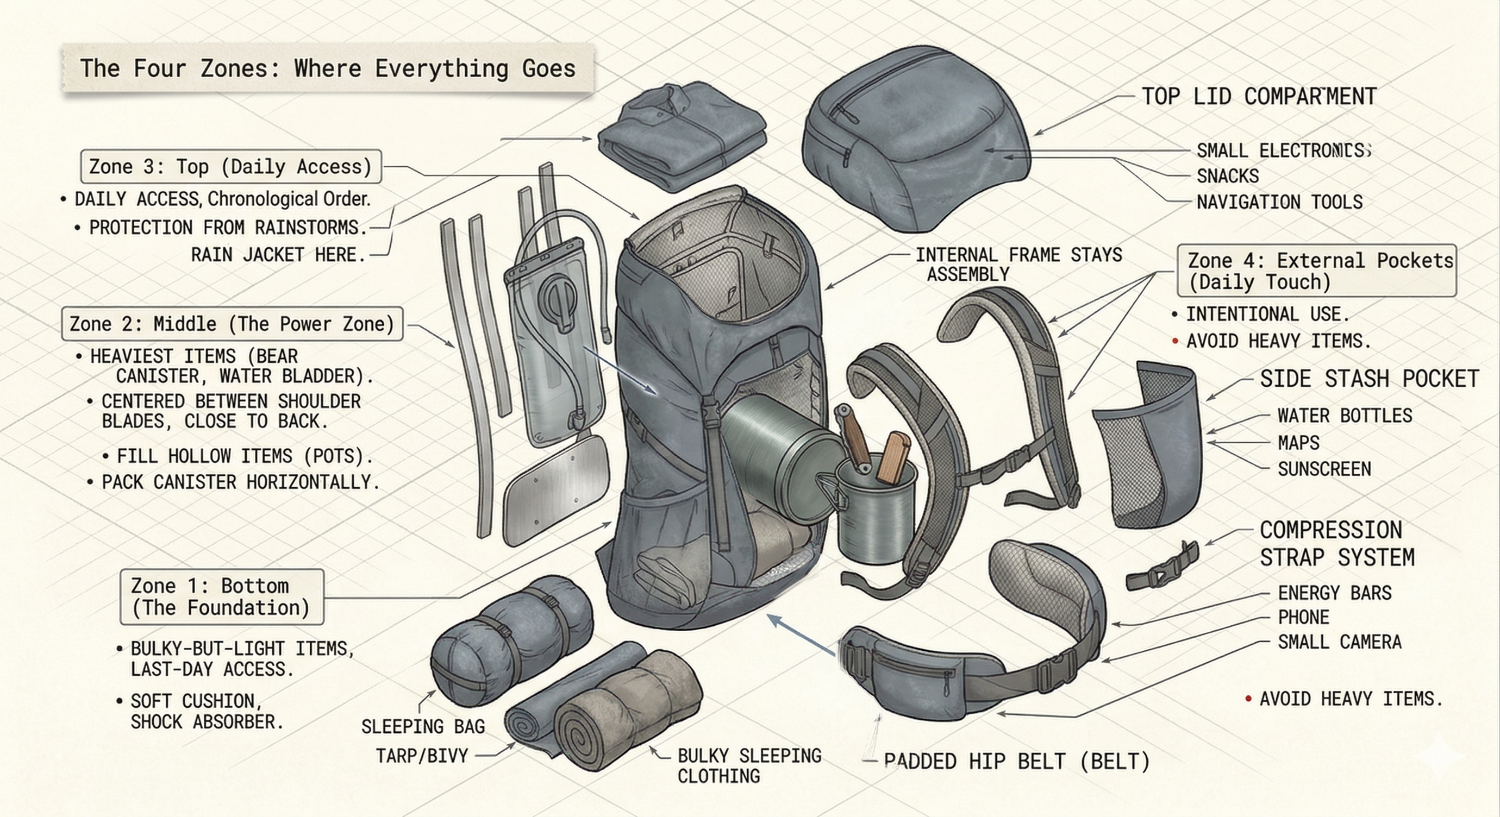
The Four Zones: Where Everything Goes
Think of your pack as divided into four zones. Each zone has a job: some items need protection, some need quick access, and some need to sit where they’ll keep you balanced. Here’s how to fill each one.
Zone 1: Bottom (The Foundation)
Your sleeping bag or other bulky-but-light items that you won’t need on the trail should go into the bottom. Your sleeping bag is the last thing you’ll reach for at the end of the day, so it makes sense for it to be the last thing you can get to.
Beyond just keeping it out of the way, a sleeping bag on the bottom provides a soft cushion for your other gear to ride on top of, and works like a shock absorber to reduce impact on your shoulders and hips. Once your bag is down there, stuff the nooks and crannies in the bottom with other bulky, soft things such as your tarp or bivy, sleeping pad, or clothing that you plan to sleep in.
Zone 2: Middle (The Power Zone)
This is the most important zone. Your heaviest items — bear canisters full of food, pots stuffed with clothes — and the bulk of the weight of your pack (including water bladders) should be centered between your shoulder blades and close to your back.
By putting these items in the middle of your back, you alleviate a good deal of stress from your shoulders and lower back. Get this zone wrong and all the weight at the bottom will pull you backwards, while all the weight at the top makes you top-heavy on rough ground.
Fill hollow items like pots with smaller gear — wasted space inside a pot is wasted space in your pack. That’s a trick that pays off over many miles.
Bear canisters deserve special mention. Packing a bear canister horizontally is the most efficient use of space and minimizes areas that might dig into your back. Put the canister on the bottom of the middle layer or on top of your sleeping bag and extra clothing — this way it will fit nicely into your lumbar region and keep your center of gravity low and balanced.
Zone 3: Top (Daily Access)
This section is best suited for bulky items you might need to access during the day while you’re on the trail. When packing towards the top of your pack, think about what you’ll need throughout the day in chronological order, how the weight is distributed, and whether you can quickly protect all of your gear from sudden rainstorms.A rain jacket belongs here. It will rain exactly when your jacket is least accessible. Always. Keep waterproofs where you can grab them without unpacking half your bag.
Zone 4: External Pockets (Everything You’ll Touch All Day)
Modern backpacking packs have all sorts of external pockets, from the top lid to side and front stash pockets, front zippered pockets, hip belt pockets, shoulder strap pockets, and more. Some stash pockets are even made with built-in drains or from durable mesh, making them great places to store wet gear.Use these pockets intentionally:
- Top compartment: small electronics, snacks, or navigation tools.
- Side pockets: water bottles, maps, or sunscreen.
- Hip belt pockets: energy bars, your phone, or a small camera.
The one hard rule for external pockets: avoid storing heavy items in your external pockets — especially those on the front of your pack body — as they can negatively impact weight distribution and throw you off-balance.
Weight Distribution: The Physics of a Comfortable Pack
The zone system above handles vertical placement. But there’s another dimension: how close the weight sits to your spine.
The internal frame pack must carry the heaviest items at the center (between the shoulder blades). Keeping dense, heavy items close to your spine and centered in the pack prevents the dreaded pack wobble that turns technical terrain into an exhausting wrestling match with your load.Studies have shown that an unevenly distributed load can increase energy expenditure by up to 15%. That means you’re working harder for no good reason, burning through calories and stamina faster than necessary. On a long day, that’s significant.
A few other weight distribution principles worth knowing:
Fill the gaps. Use spare clothes that you don’t need throughout the day to fill in the gaps between heavier items. This will keep them from shifting around while you are hiking, and help prevent irregular items from poking you uncomfortably as you trek.
Pack horizontal layers, not vertical columns. Think about stacking items in horizontal layers rather than vertical columns to distribute weight more evenly across the pack.
Adjust as food disappears. Over the course of a multi-day trip, your pack’s weight will naturally shift as you use up supplies. Keep essentials like snacks, water, and navigation tools in easy-to-reach side pockets or hip belt compartments — this way, you don’t disturb the pack’s overall balance when grabbing something quickly.
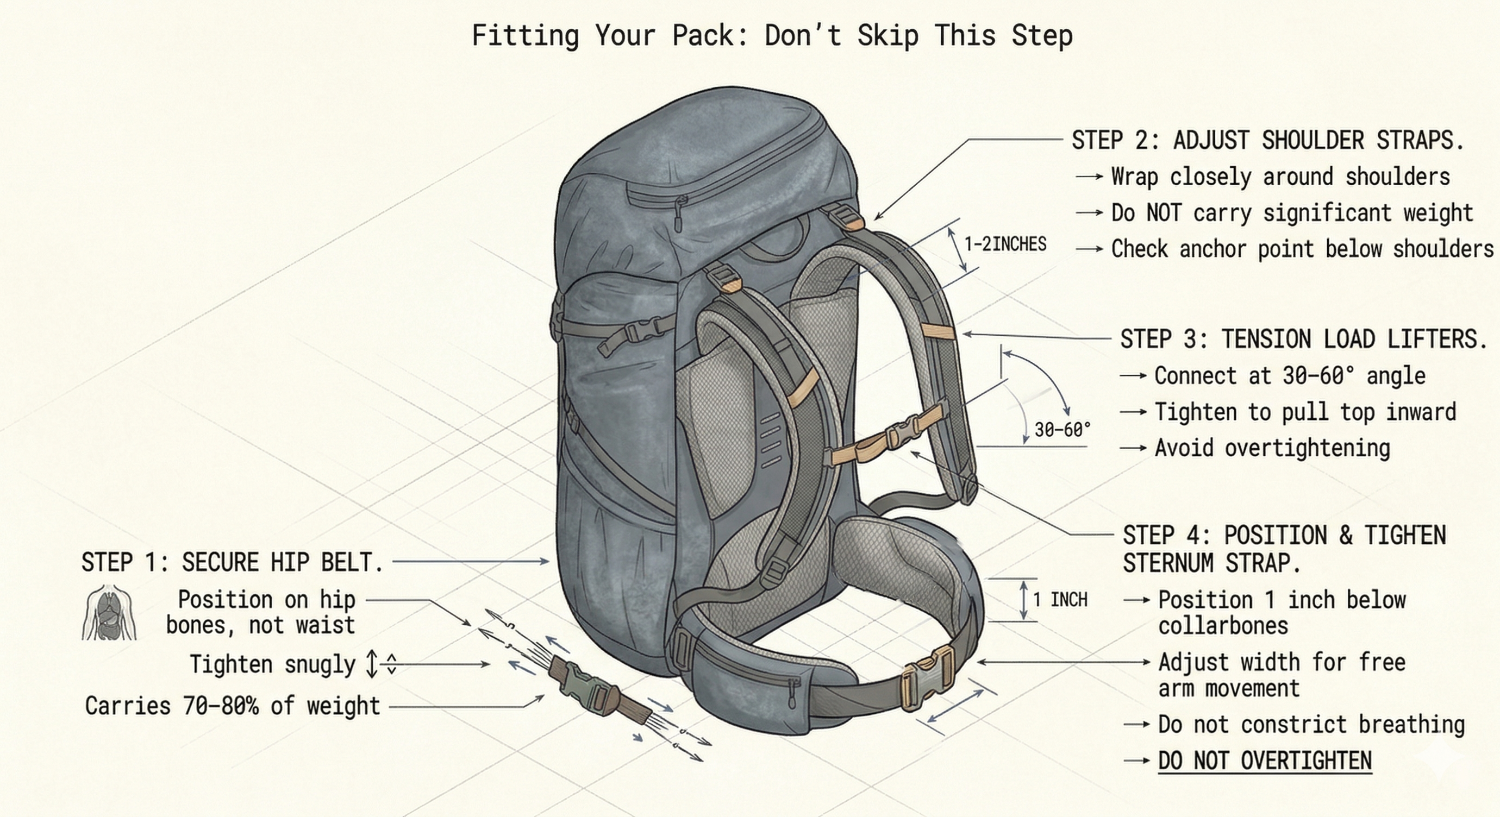
Fitting Your Pack: Don’t Skip This Step
You can pack the zones perfectly and still be miserable if your harness isn’t adjusted right. Most hikers set their shoulder straps and call it done. That’s leaving serious comfort on the table.
Start with the hip belt, every time. Tightening the hip belt snugly allows it to bear 70–80% of the pack’s weight and reduces fatigue. Ensure the hip belt is carrying the majority of the weight and positioned on your hip bones rather than your waist.
Then dial in your shoulder straps. Shoulder straps should wrap closely around your shoulders, but they should NOT be carrying significant weight. If they are, you’ll be putting undue stress on shoulder, neck, and upper-back muscles. Check to see that the shoulder strap anchor points on your pack are 1 to 2 inches below the top of your shoulders, roughly at the top of your shoulder blades.
Use your load lifters. Load lifters should come off the top of your shoulder straps at a 30–60° angle and attach to the top of the pack. Tighten them just enough to pull the top of the pack inward toward your upper back, but don’t over-tighten or the shoulder straps will dig in.
Set the sternum strap last. Slide the sternum strap until it’s at a comfortable height across your chest — roughly an inch below your collarbones. Buckle and tighten it to set the shoulder straps at a width that allows your arms to move freely. Avoid the common mistake of overtightening, as it can distort the overall fit of your harness, constrict your chest muscles, and restrict your breathing.
After mile 10, your near-perfect fit can seem like a distant memory. Good fit, though, requires continuous attention on the trail. Master how things adjust by playing with all of your straps extensively when you first get your pack.Waterproofing: Don’t Trust Your Pack Alone
Most backpacks are not waterproof — even ones made with waterproof fabrics like Dyneema DCF and Xpac. That’s because the stitching used to sew them together creates many tiny holes in the fabric that leak water unless the manufacturer seals them with seam tape. Backpack rain covers are primarily designed to prevent the fabric of your backpack from soaking up water when it rains, but they do a poor job of keeping the gear inside your backpack dry. Internal condensation, leaky seams, and poor fit are all contributing factors, and a lot of hikers don’t even bother with them.The better solution — and the one thru-hikers have sworn by for decades — is a pack liner. The first thing to do when packing your backpack is to line the inside with a thick trash compactor garbage bag. These plastic bags are very tough, last a long time, and are an excellent defense against rain and wet ground for three-season and winter hiking and backpacking.
If your backpack isn’t waterproof, line the inside with a trash compactor liner, which is lighter and thicker than a standard garbage bag and lighter than most pack covers. If you want a more durable, purpose-built option, Nylofume pack liner bags are fully waterproof and made from a special nylon film that’s also an odor-resistant barrier to help keep your food and smellables under bear radar.
One important distinction: a wet shelter or rain gear can be stored outside the pack liner but still inside the main compartment. Keep your dry gear dry; let the wet stuff stay wet and separate.
For ultralight packs specifically: many ultralight backpacks have minimal or no frames, so you can often use your sleeping pad to add shape and support. Fold up your sleeping pad and place it inside the pack against your back to create a padded frame as well as an extra layer between your gear and your back.
Practical Tips
- Lay everything out before you pack. It’s helpful to set out your gear based on where it might go in your pack before you start loading. This prevents the “shove and hope” method and helps you catch anything you forgot.
- Fill every void. Don’t leave areas of empty space in your pack. Fill nooks and crannies to give the pack structure and prevent gear from shifting as you walk.
- Think in horizontal layers, not vertical piles. Dense, heavy gear goes against your spine in the middle zone. Soft, light gear fills around it.
- Keep your rain jacket accessible. It never rains when your jacket is on top. Always assume it will rain.
- Use compression straps. By compressing the load, you’ll stabilize your gear and keep it from swaying.
- Use a liner, not just a rain cover. A trash compactor bag inside your pack provides real waterproofing. A rain cover keeps the exterior dry and mostly lets the interior get wet anyway.
- Test your fit at home with a loaded pack. Pack your backpack and test it out in similar terrain before your actual trip. A bonus is that you’ll build up your muscle strength and hiking stamina, while having the opportunity to make adjustments before you take on a planned trip.
- Adjust throughout the day. Shift shoulder strap tension, loosen the hip belt on climbs, and tighten load lifters on descents. Your body and pack weight change across a hiking day.
- Fuel lives outside the food bag. Place fuel bottles outside your pack liner to contain potential leaks, protecting food and clothing from contamination.
Wrapping Up
Packing a backpack is a skill, and like any skill it gets faster and more intuitive with repetition. The fundamentals never change: heavy items centered close to your spine, light gear at the bottom and top, quick-access items where you can actually access them quickly, and everything dry enough to sleep in at night. Get your harness dialed before the trailhead, not 10 miles in. Once this system becomes muscle memory, you’ll spend less time thinking about your pack and more time thinking about where the trail is taking you — which is the whole point.